How To Remove Ps5 Cover: Unveiling The Console’s Inner Workings
Are you curious about what’s inside your PS5 console? Have you ever wanted to take a closer look at its inner workings? Well, you’re in luck because in this article, we will show you how to remove the PS5 cover and unveil the console’s internal components.
By following a few simple steps, you’ll be able to explore what lies beneath the sleek exterior of your gaming powerhouse.
To begin, you’ll need a few tools and a bit of patience. Once you’ve gathered everything, we’ll guide you through the process of preparing your console for cover removal. Then, we’ll show you how to detach the side panels and carefully remove the top cover, giving you access to the fascinating internal components.
It’s important to handle everything with care and follow our step-by-step instructions to ensure a safe and successful disassembly. And don’t worry, we’ll also provide guidance on how to safely reassemble your console once you’re done exploring.
So, get ready to dive into the inner workings of your PS5 and discover what makes it tick.
Key Takeaways
- The PS5 cover can be removed by gently sliding it upwards with even pressure on both sides.
- Before removing the cover, make sure the console is turned off and all cables are disconnected.
- Use a Phillips screwdriver to remove the small screw at the back of the PS5 that holds the cover in place.
- When reassembling the console, align and press the top and bottom halves together snugly, and reattach the screws without overtightening.
Gathering the Necessary Tools
Now that you’ve got all your tools ready, it’s time to dive into the exciting process of removing the PS5 cover and uncovering its mesmerizing inner workings! To successfully remove the cover, you’ll need a Phillips screwdriver, a flathead screwdriver, and a pair of tweezers.
These tools will help you navigate through the intricate design of the console and reveal its secrets. Start by locating the small screw at the back of the PS5 and use the Phillips screwdriver to unscrew it. Once the screw is removed, gently slide the cover upwards, applying even pressure on both sides. Be careful not to force it or apply too much pressure, as this could damage the console.
With a little patience and finesse, you’ll soon have the cover off and be ready to explore the inner workings of your PS5!
Preparing the Console for Cover Removal
First, you’ll need to get ready to take off the protective case and discover the mesmerizing secrets concealed within your beloved gaming system. Start by turning off your PS5 and disconnecting all cables from the console. This will ensure your safety and prevent any damage to the internal components.
Next, find a clean, well-lit workspace where you can comfortably work on the console. Remove any nearby objects that may obstruct your access to the console’s cover. Grab a small Phillips head screwdriver, as this’ll be essential for removing the screws that secure the cover. Keep in mind that the PS5 cover is held in place by several screws, so make sure to have a container ready to store them safely.
With these preparations complete, you’re now ready to move on to the next step: removing the PS5 cover and delving into its inner workings.
Removing the Side Panels
Get ready to explore the hidden secrets of your beloved gaming system by taking off its protective case and revealing the mesmerizing wonders concealed within.
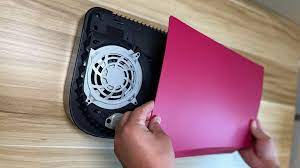
To remove the side panels of your PS5, follow these simple steps. First, locate the small tab on the back of the console. Gently pull it towards you to release the panel. Repeat this step for the other side.
Once both tabs are pulled, carefully slide the panel towards the back of the console and lift it off. Be cautious not to force it or apply too much pressure, as this may damage the panel or the console itself.
With the side panels removed, you’ll now have a clear view of the inner workings of your PS5, ready to embark on the next step of your exploration.
Detaching the Top Cover
To embark on the next step of our exploration, let’s detach the top of our beloved gaming system and unveil its hidden secrets.
Removing the top cover of the PS5 is a straightforward process that requires a bit of care. First, make sure the console is powered off and unplugged.
Then, locate the two small screws at the back of the console near the top. Using a Phillips screwdriver, carefully unscrew these two screws and set them aside.
Once the screws are removed, gently lift the top cover from the back and slide it forward to detach it from the console. Be cautious not to apply too much force or bend the cover.
With the top cover removed, you can now catch a glimpse of the inner workings of the PS5 and begin to further explore its fascinating components.
Exploring the Internal Components
Now that we’ve detached the top cover, it’s time to delve into the fascinating world of the PS5’s internal components.
You’ll be amazed at the intricate design and advanced technology packed into this console. As you take a closer look, you’ll notice the powerful AMD Zen 2 CPU and the custom RDNA 2 GPU. These components work together to deliver stunning graphics and smooth gameplay.
The high-speed SSD provides lightning-fast loading times, allowing you to jump into your favorite games in an instant.
Don’t forget to check out the cooling system. It ensures that the console stays cool even during intense gaming sessions.
And let’s not overlook the innovative DualSense controller. With its haptic feedback and adaptive triggers, it adds a whole new level of immersion to your gaming experience.
Safely Reassembling the Console
When putting the PS5 back together, make sure to handle the internal components with care to avoid any damage.
Begin by aligning the top and bottom halves of the console, ensuring that all the connectors and ports are properly aligned. Gently press the two halves together, making sure they fit snugly.
Next, reattach the screws to secure the cover in place, being careful not to overtighten them.
Once the screws are in, plug in all the necessary cables, such as the power cord and HDMI cable. Double-check that all the connections are secure and in the correct ports.
Finally, power on the console and listen for any unusual noises or vibrations. If everything appears to be functioning properly, congratulations! You’ve successfully reassembled your PS5. Enjoy your gaming experience!
Frequently Asked Questions
Yes, you can easily remove the PS5 cover without any specialized tools. Just use your hands to gently pry off the cover and reveal the console’s inner workings. No need for extra equipment!
Removing the side panels of the PS5 may void the console’s warranty. It’s important to consult the manufacturer’s guidelines or contact customer support to ensure you don’t risk losing warranty coverage.
Before detaching the top cover of your PS5, there are a few precautions you should take. First, make sure the console is powered off and unplugged. Then, use a screwdriver to carefully remove the screws securing the cover.
Removing the cover of the PS5 can potentially cause damage to the internal components if not done properly. It is important to follow the proper instructions and take necessary precautions to avoid any harm.
To ensure a safe and secure reassembly of the PS5 console after removing the cover, make sure to align the cover properly and gently snap it back into place. Double-check all connections and screws before powering on the console.
Conclusion
Now that you’ve successfully removed the cover of your PS5 console, you can truly appreciate its inner workings. By following the steps outlined in this guide and using the necessary tools, you were able to explore the internal components and gain a deeper understanding of the console.
Remember to safely reassemble the console to ensure its proper functioning. With this newfound knowledge, you can now confidently tackle any future maintenance or upgrades that may be needed for your PS5.
Leave a Reply