How To Remove Ring Doorbell: Quick And Hassle-Free Steps To Take It Down
Are you looking to remove your Ring doorbell? Whether you’re moving to a new home or upgrading to a newer model, taking down your Ring doorbell can be a quick and hassle-free process. In this article, we will guide you through the necessary steps to safely remove your Ring doorbell without any complications.
First, gather the tools and equipment you’ll need for the job.
Then, turn off the power to the doorbell to ensure your safety.
Next, remove the faceplate and disconnect the wires from the doorbell.
After that, detach the mounting bracket from the wall.
Once the doorbell is removed, you might notice some holes or marks on the wall. Don’t worry, we’ll show you how to patch them up seamlessly.
Finally, decide whether you want to reinstall the doorbell in a new location or dispose of it.
By following these quick and hassle-free steps, you’ll be able to remove your Ring doorbell in no time. Let’s get started!
Key Takeaways
- Gather necessary tools and equipment, such as a screwdriver and ladder, before starting the removal process.
- Turn off the power to the doorbell by locating the circuit breaker or fuse box and flipping the breaker to the ‘off’ position.
- Carefully remove the faceplate and disconnect the wires, keeping track of their connections.
- Remove the mounting bracket by unscrewing the security screws and gently pulling it away from the wall, being cautious of surrounding components.
Gathering the Necessary Tools and Equipment
Now you’re ready to gather all the tools and equipment you’ll need to easily remove your Ring doorbell. First, grab a screwdriver that matches the screws on your doorbell. This will make it much easier to unscrew and remove the device.
Next, find a ladder or step stool to safely reach the doorbell. Make sure it’s stable and secure before climbing up.
Additionally, have a small container or bag handy to hold any screws or small parts you remove during the process. This will prevent them from getting lost.
Lastly, if you have a helper, it’s always good to have an extra pair of hands to hold the ladder or assist with any other tasks.
With these tools and equipment, you’ll be well-prepared to tackle the removal of your Ring doorbell.
Turning Off the Power to the Doorbell
First, make sure to switch off the power to your doorbell in order to safely proceed with removal. This step is crucial to prevent any electrical accidents or shocks.
Start by locating the circuit breaker or fuse box in your home. Look for the specific breaker that controls the power to your doorbell. It’s usually labeled or identified. Once you’ve identified the correct breaker, flip it to the ‘off’ position. This will cut off the power supply to your doorbell.
To double-check, test the doorbell by pressing the button. If it doesn’t ring or light up, then the power has been successfully turned off. Remember, safety should always be a top priority when working with electrical devices.
Removing the Faceplate and Disconnecting the Wires
To safely proceed with the removal process, it’s essential to disconnect the wires and remove the faceplate of the doorbell.
Start by turning off the power to the doorbell, as mentioned in the previous subtopic. Once the power is off, locate the faceplate and gently remove it by pulling it away from the wall. Be careful not to damage any surrounding areas.
Next, you’ll see the wires connected to the back of the faceplate. To disconnect the wires, simply unscrew the terminals holding them in place. Make sure to keep track of which wire connects to which terminal for easy reinstallation or replacement.
Once the wires are disconnected, you can safely remove the faceplate and proceed with the rest of the removal process.
Detaching the Mounting Bracket from the Wall
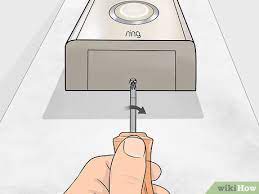
Once you’ve disconnected the wires and removed the faceplate, it’s time to detach the mounting bracket from the wall. Start by unscrewing the security screws that hold the bracket in place. Use a screwdriver to carefully loosen and remove these screws.
Once the screws are out, gently pull the bracket away from the wall. Be cautious not to damage the wires or any other surrounding components. If the bracket feels stuck, you can try wiggling it slightly to loosen it.
Once detached, set the mounting bracket aside in a safe place. Remember to keep track of all the screws and small parts you remove during this process.
With the mounting bracket removed, you’re one step closer to completely removing your Ring Doorbell.
Patching up any Holes or Marks from the Removal
After detaching the mounting bracket, it’s time to take a moment and appreciate the blank canvas that awaits you for patching up any unsightly holes or marks left behind.
Start by gathering the necessary tools for the job, such as spackling compound, a putty knife, sandpaper, and matching paint.
Begin by using the putty knife to apply a thin layer of spackling compound over the holes or marks. Smooth it out and let it dry completely.
Once dry, use sandpaper to lightly sand the patched areas until they’re smooth and blend seamlessly with the surrounding wall. Wipe away any dust with a damp cloth.
Lastly, touch up the patched areas with matching paint, ensuring a seamless finish.
Stand back and admire your handiwork, knowing that the wall looks as good as new.
Reinstalling or Disposing of the Doorbell
Now that you’ve successfully transformed your wall into a flawless canvas, it’s time to decide whether you want to reinstall or dispose of your doorbell. If you plan on reinstalling it, carefully pack all the components, including the doorbell itself, screws, and any other accessories, into a safe and secure place. Make sure to keep everything organized to avoid any confusion later on.
However, if you no longer need the doorbell or want to upgrade to a newer model, it’s best to dispose of it properly. Contact your local recycling center or electronic waste disposal facility to ensure it’s recycled responsibly. Remember to remove any personal information or settings from the device before disposing of it to protect your privacy.
Frequently Asked Questions
Yes, you can remove the Ring Doorbell without turning off the power. Simply follow the steps to detach it from the mounting bracket, being careful not to touch any live electrical wires.
If there are multiple wires attached to the Ring Doorbell, you should carefully disconnect each wire from the terminal screws. Make sure to label the wires for easy reinstallation later.
Yes, you can reuse the mounting bracket if you decide to reinstall the Ring Doorbell in the future. Simply detach the doorbell from the bracket and store it safely until you’re ready to reinstall.
To ensure a clean and seamless patch-up of any holes or marks left on the wall after removing the Ring Doorbell, you can use spackle or putty to fill the holes, sand it down, and then repaint the wall for a smooth finish.
Conclusion
In conclusion, removing your Ring Doorbell is a straightforward process that can be done quickly and without any hassle. By gathering the necessary tools and equipment, turning off the power, and disconnecting the wires, you can easily take down the doorbell.
Remember to detach the mounting bracket and patch up any holes or marks left behind. Whether you choose to reinstall or dispose of the doorbell, following these steps will ensure a smooth and efficient removal process.
Leave a Reply